 USD
USD EUR
EUR GBP
GBP CAD
CAD AUD
AUD JPY
JPY
If you have any problem in set up Raspberry, please contact us:
https://www.facebook.com/Juvtmall-1783518048628335/
or juvtmall2016@gmail.com
Raspberry Pi 3B
First, hold your Raspberry Pi, there are four USB interfaces, a network port, a HDMI port, an earphone port, an Android interface and a SD card port.
1. Install IMG to your Raspberry Pi
1.prepare for something
The IMG of Raspberry Pi is named Raspbian.
Download the Raspbian from the following website:
https://mega.nz/#!LxcEiZ7A!PSLA5zq7Pa8DAab9gRHZkv4OwMpEGQhPAIUvhl25OXM
This IMG has already added driver of Raspberry Pi’s screen. You can also download Raspbian from official website.
Then, get a TF card, make sure that the storage is larger than 8G, format it, burn the Raspbian to your TF card, you can down win32 disk imager from the following website:
https://sourceforge.net/projects/win32diskimager/
2.Burn the Raspbian to TF card
burn the Raspbian to a TF card by this software
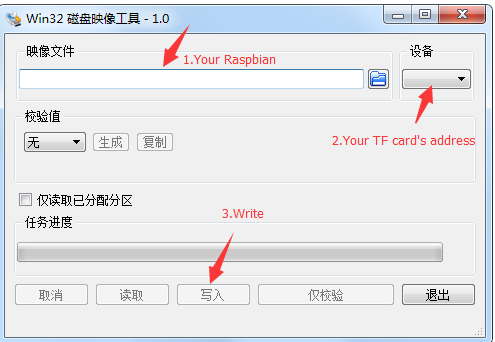
You may find that the whole room of your TF card has been reduced largely, don’t worry, your TF card’s room haven’t been reduced, it’s normally for this situation.) If you want to use the XShell terminal, write a file which named ssh into root directory (for the Raspbian haven’t write this commond), the file could be empty, I am preparing for teaching you control the Raspberry Pi via XShell.
Plug the TF card to your Raspberry Pi, then you have finish it.
2. Connect the Raspberry Pi to computer
Connect your computer and Raspberry Pi to the rooter, let them share the net, for easily find your Raspberry Pi’s IP, you can download the following software into computer:
Advanced IP Scanner:
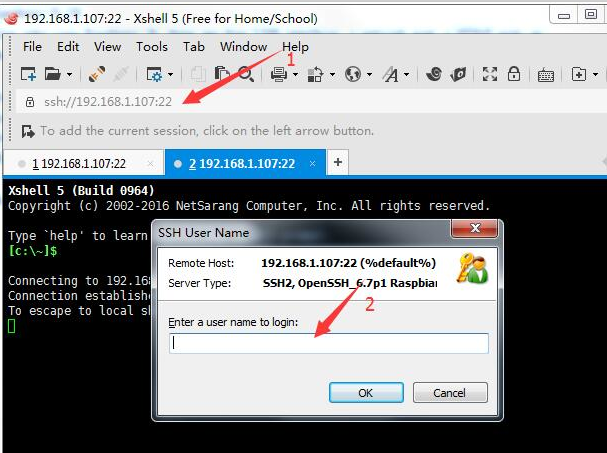
If your root has connected many terminal, you can try the software, start the software click the start option, wait a minute, you can find a manufacturer which named Raspberry Pi Foundation, then find the corresponding IP, it’s the host name of Raspberry Pi, open XShell, input the host name at “1”
Raspberry Pi’s name is pi, password is raspberry.
Then you can input command to your Raspberry Pi with a computer.
3.How to set the Wi-Fi?
I don’t want to use a network cable every time I want to use my computer.
There are two methods to connect computer to Raspberry Pi:
First, you have to connect Raspberry Pi with a network cable.
Method one: use the screen designed for Raspberry Pi, this way could be visible
Connect screen to Raspberry Pi,
1.if you have download Raspbian from my link, just choose corresponding size below and input it into your XShell.
cd LCD-show/ This must be input
sudo ./LCD35-show for 3.5 inch screen (it can also use for 4inch screen)
sudo ./LCD5-show for 5inch screen
sudo ./LCD7C-show for 7inch screen(1024*600)
sudo ./LCD-hdmi If you need to switch back to the traditional HDMI display
sudo ./LCD28-show 2.8inch
sudo ./LCD32-show 3.2inch
sudo ./LCD397-show 3.97inch
sudo ./LCD43-show 4.3inch
sudo ./LCD7B-show 7inch (800*480)
2.if you download Raspbian from official website, then you have to run command as below:
git clone https://github.com/goodtft/LCD-show.git
chmod -R 755 LCD-show
cd LCD-show/
Then choose the screen you need from above.
Your screen can be work, but the touch function is not very comfortable, for the touch screen haven’t calibrate, input the following command, it can calibrate.
cd LCD-show
sudo dpkg -i -B xserver-xorg-input-evdev_1%3a2.10.3-1_armhf.deb
sudo cp -rf /usr/share/X11/xorg.conf.d/10-evdev.conf /usr/share/X11/xorg.conf.d/45-evdev.conf
sudo reboot
Wait a few minutes, the system will restart automatically, then you can enjoy your LCD.
3.5inch Touch TFT Screen for Raspberry Pi
5inch Touch TFT Screen for Raspberry Pi (HDMI+ Micro USB)
7inch Touch TFT Screen for Raspberry Pi/Banana Pi/Beagle Bone/Win 7/8/10 XP (1024*720)
At the upright corner, there’s the option of network, click it and choose Wi-Fi, input password, it will remember the account and password. Do not need a network cable any more.
Tip: it’s easy to set Wi-Fi in this way, however, you need to click the screen whenever you start Raspberry Pi. But it’s cool to see the image.
Method two:
Check IP, input the command:
lwconfig
There are three paragraph messages: eth0…………lo……………………..and wlan0
Eth0 means ethernet
Lo means loop
Wlan0 means wireless network
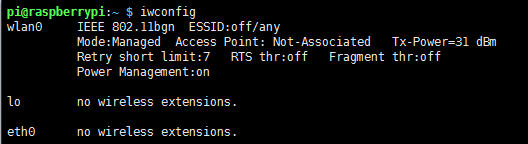
If there’s no Wlan0, input the following command to download a Wi-Fi scale:
sudo apt-get install wirelss-tools wpasupplicant firmware-realtek
Then input
iwlist wlan0 scan
for scanning the Wi-Fi which Raspberry Pi can search, it’ll show you the detail of all the Wi-Fi he has search for, if don’t need so much information, just input this command:
sudo iwlist wlan0 scan | grep ESSID
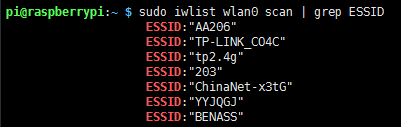
Check if there’s your Wi-Fi name
Input:
wpa_passphrase SSID password
Tip: SSID is your Wi-Fi’s name and password is password to Wi-Fi, don’t just input “SSID password”
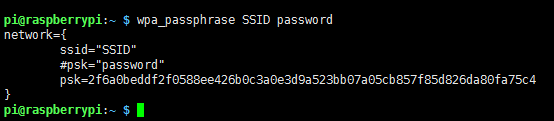
You’ll get your own psk
Copy these final sentences (network=…………psk=………) and paste to ini file, like this:
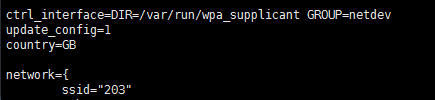
Input command: sudo nano /etc/wpa_supplicant/wpa_suppilcant.conf
Copy the sentences behind the sentence shows after command
Ctrl + O save
Enter confirm
Ctrl+ X exist
Finally, input the following command:
sudo /etc/init.d/networking restart
sudo service networking restart
sudo ifdown wlan0
sudo ifup wlan0
wpa_cli status check the status of link
For checking it did work, input
Ifconfig
There’s waln0 equipment and there’s IP (it means it’s connected), if there’s no respond, just input
sudo reboot
to restart the Raspberry Pi.
Tip: you need to input the above command, it may complex, but you don’t need to input these commands any more, however, if you have change the name or password of Wi-Fi or you have change to others Wi-Fi, you have to do the same thing as above again.
4.Set static IP
You may say: no, though I can use Wi-Fi and don’t need network cable, I still have to use Advanced IP Scanner to search IP of my Raspberry Pi, it’s so inconvenient.
I will teach you how to set static IP
First: input the following command:
sudo nano /etc/dhcpcd.conf
Secondly: input these command to the bottom line:
interface eth0
static ip_address= (the static IP you want)
static routers= (your routers)
static domain_name_servers= (domain)
Tip: this is the way to set eth’s static IP
The following is about how to set wireless static IP:
Input the command:
interface wlan0
static ip_address= (the static IP you want)
static routers= (your routers)
static domain_name_servers= (domain)
5. see the version
There are so many ways to see the version:
1.by smartphone
First, download two software:
JuiceSSH this is terminal
AndroidVNC this is VNC used to display the version
Ensure the smartphone and Raspberry Pi has connect to the same network, you can open the USB wifi share of smartphone, then connect Raspberry Pi and smartphone with an USB cable, try to get IP of Raspberry Pi.
Open JuiceSSH, set a new connect, give it a name and input Raspberry Pi’s IP, connect it, you can see that it’s easy to write command via smartphone for it has serve for many shortcut key.
Set up a software by the following command:
sudo app-get install tightvncserver
This command is used for installing tightvncserver
vncserver
This command is used to open androidVNC
vncpasswd
It will require you to type a password which is 8-bit
When have done this, you may feel wired that it hasn’t show anything, don’t worry, it hasn’t been typed in actually, verify the password, there’s a port hide in the last sentence,

1 is the port.
Open androidVNC, give it a name you want, set password, type raspi’s IP, port is 590x, x is just what you see at the last sentence: 1. Username is pi, the color format is suggested to be 24-bit color (4bpp), click at “Local mouse pointer” you can control the mouse pointer, finally, push the option connect at the upleft corner. You can enjoy it now
2.via computer
This can be divided into two ways:
A method that don’t need to download a software named VNCViewer to computer and the other needed.
Method one:
Connect Raspberry Pi with computer, use the terminal named XShell (you have install it before) to write command.
Type these command:
sduo apt-get install xrdp
Now, we find push WIN+R on the keyboard to start a CMD on computer, type mstsc in and push enter, a dialog box appears, input Raspi’s IP, select “connect”, it can work now.
At the bottom of dialog box, there’s an option named “show item”, click it and choose “display”, you can set the pixel of screen and the color.
Tip: it seems very simple, however, the effect is not so good for my computer, the screen act so slowly.
Method two:
Download a software named VNCViewer,
Type the following command, since you have install the tightvnc by typing
sudo apt-get install tightvncserver
Type the following command:
tightvncserver open tightvncserver
There’s a message of port appear in the last sentence: raspberrypi: n, the number is name of port
vncpasswd ready to set VNC’s password
The password also need be 8-bit, if password have surpassed 8-bit, it will default to the fore 8-bit password.
Go to start VNCViewer,
Type IP in this way: IP:port for example: 192.168.1.100:1
Input your password, and is OK.
3.via screen, just see the forth of how to set Wi-Fi.
6.How to change password of Raspberry Pi?
Input:
Passwd
It will require you to type in pre-password then input new password and verify it.
It won’t appear anything when you type something, because it’s for safety.
