 USD
USD EUR
EUR GBP
GBP CAD
CAD AUD
AUD JPY
JPY
Introduction
This is RTC (real time clock) for Raspberry Pi, we know that almost all the RTC should be work on 5 volts, and Raspberry Pi’s GPIO serve for 3.3 volts, this RTC module is designed for Raspberry Pi, plug it to GPIO, can output 3.3V and 5V. Tip: if powered by GPIO, then do not power it with serial port, someone may make this mistake. There’s a TX (transmit) and a RX (receive), so, it’s convenient to connect to other device with serial port. RTC module can calculate time within ±2ppm, it shows date in this formation: week day month hour, minute, second, time zone year. When there’s a leap year, or days has changed in some month, it can adjust by itself. Chip DS1307 is build- in, DS1307 is a low power with highly accuracy real time clock. RTC module contains input port of battery, therefore, it still keeps accuracy of calculating time, when battery supply the power, static current is lower than 500nA.
Features
Chip: DS1307
Battery is CR1220
Could be controlled by shell script
Suit for GPIO of raspberry Pi
Could output square wave by program
RTC module can monitor the state of VCC, when detect power’s trouble, serve for reset output, and switch to backup power automatically.
Technical Datas
Interface:
Raspberry pi B 2*13 port
GPIO of Raspberry Pi 3
Space between interface: 2.54mm
Parameter
Operate voltage: 5V
Accuracy: ±2 ppm in 0℃ to +40℃
Valuable till 2100, leap year will get right compensation till 2100
Two calendar alarm clocks
Operate temperatures: -10℃ to +85 ℃
Package
8 pins 64 mil so package
Application
Intelligent home
Remote message deal system
Usage
1.How to install it and how to get the right time?
1.install or renew i2c manage tool:
sudo apt-get install i2c-tools
2.Load i2c device
sudo modprobe i2c-dev
3.Scan i2c device
sudo i2cdetect -y -a 1
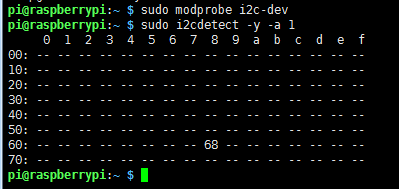
There’s a number 68 at the row of 60 and the column of 8
If it shows ”_” , the RTC module haven’t been detected or it is broken.
“_” means there’s no returned signal, UU means there’s returned signal but the corresponding address of device is occupied, the others returned value means the device has been detect and haven’t been occupied.
Trans to root identity
sudo su -
load i2c device
sudo modprobe i2c-dev
Indicate which driver should be used on device:
echo "ds1307 0x68"> /sys/class/i2c-adapter/i2c-1/new_device
Exit root
exit
See the time:
sudo hwclock -r get date from RTC module
set system date as RTC module’s time
sudo hwcock -w
however, the time may differ in several hours, it depends on your timezone.
Now, we get the real time on your location:
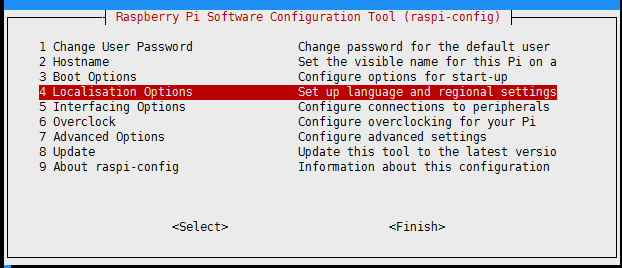
Open setting page
sudo raspi-config
Choose “Localisation Options”
Choose “Change Timezone”
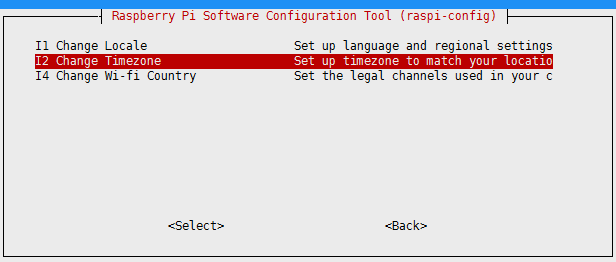
Then choose the continent, country and city.
Here’s the date:

2.How to get the time whenever you open the Raspberry Pi?
Load in root
sudo su

Load setting page:
sudo raspi-config
choose “Interfacing Options”
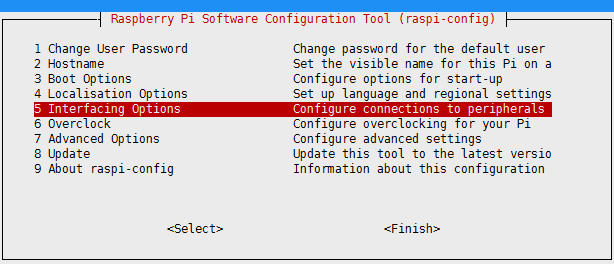
Choose “I2C”
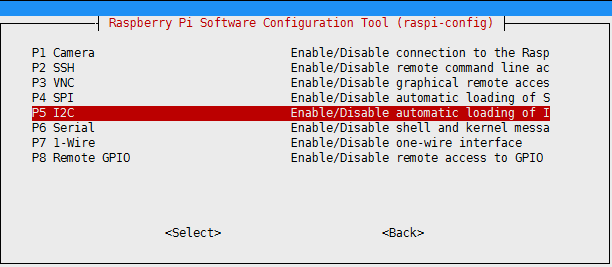
Select “yes”
sudo nano /etc/rc.local
Find the boot of it
Insert some code between “fi” and “exit 0”, press enter after “fi” then inset the following code:
echo "ds1307 0x68" > /sys/class/i2c-adapter/i2c-1/new_device
hwclock -s
tip: these codes are at the root situation
then Ctrl+O to save
Ctrl+X to exist
sudo reboot reboot the system
start Raspberry Pi
input:
date

Detect the device:
I2cdetect -y -a 1
You’ll find this:
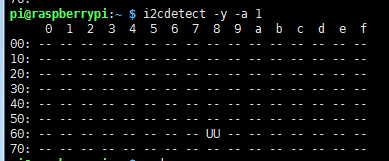
It used to be 68, and now, it shows UU, this means the device is detected and it’s working.
