 USD
USD EUR
EUR GBP
GBP CAD
CAD AUD
AUD JPY
JPY
Introduction
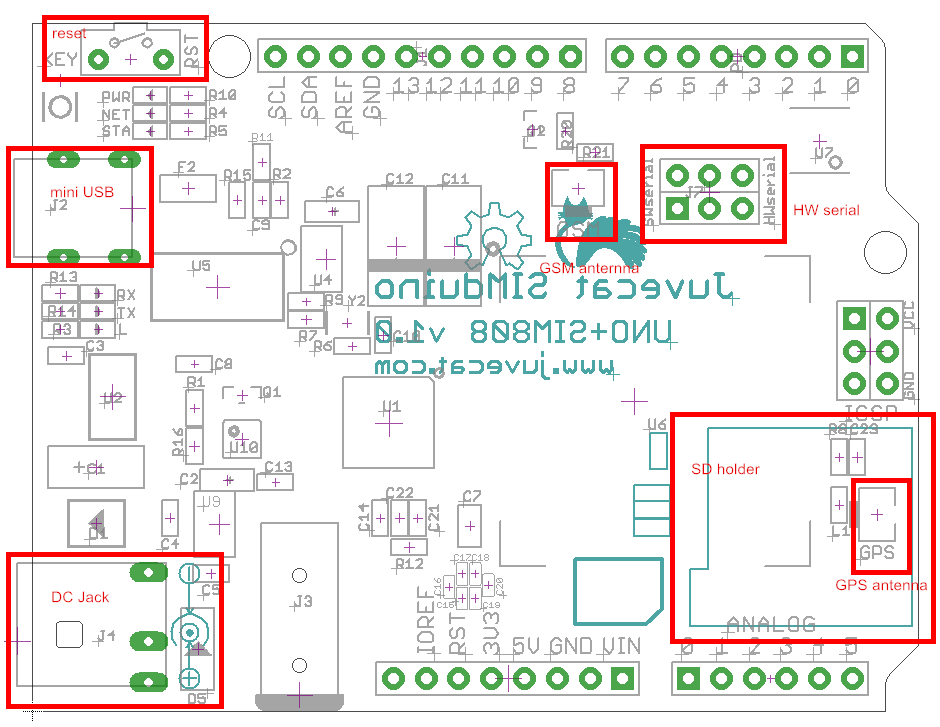
Juvcat SIMduino is a IoT panel based on the Arduino Uno board(click here for more information of Arduino Uno) and SIM808, ATmega328 is the microcontroller and GPS module is based on SIM808, SIM808 supports GPS, GPRS and Bluetooth, as you can see, it can be used to transmit/receive short message, give/answer a call, connect computer and exchange files through Bluetooth and realize the function of satellite navigation.

Technical Data
1.
Microcontroller ATmega328
Operating Voltage 5V
Input Voltage (recommended) 7 to 12V
Digital I/O Pins 14 (of which 6 provide PWM output)
Analog Input Pins 6
DC Current per I/O Pin 40 mA
DC Current for 3.3V Pin 50mA
Flash Memory 32 KB (ATmega328) of which 0.5 KB used by bootloader
SRAM 2 KB (ATmega328)
EEPROM 1 KB (ATmega328)
Clock Speed 16 MHz
2.
SIM808
GPS multi-slot class 12/10
GPRS mobile station class B
Compliant to GSM Phase 2/2+
Class 4(2W) at GSM 850MHz and EGSM 900MHz
Class 1(1W) at DCS 1800MHz and PCS 1900MHz
Bluetooth: compliant with 3.0+EDR
FM:76-109MHz worldwide bands with 50KHz tuning step
Normal operate temperature: -40℃ to +85℃
Storage temperature: -45℃ to +90℃
SIM
Controlled by AT command via UART
Supply voltage range: 3.4-4.4V
Features
Compatible with standard Arduino Leonardo
Quad-Band 850/900/1800/1900MHz
Headset jack
SIM card holder
Control via AT commands
Supports Bluetooth
Supports FM Radio
Current < 2A
Arduino Leonardob Bootloader
Interface
Usage
For editing program to Catduino Zero, Please download a Arduino IDE
Here's the software you can click to download the Arduino IDE https://www.arduino.cc/en/Main/Software)
Then install it follow the indication.
How to connect the board with computer?
1.Right click the icon named “my computer”
2.Click the “manage”
3.Choose “machine manage”
4.Then you can see a icon which named “Port(COM and LPT)”, click it.
5.A icon named Port(COM1) appear, then connect your Catduino Zero board to the computer via USB port, it will add a port named Port(COM7) or other thing, right click it
6.Click the “Update Drive Software” option.
7.Finally, choose the second item and find the Arduio IDE, then you can control the Catduino Zero.
How to use the Arduino IDE?
First of all, install the Arduino IDE,
Connect the Catduino Zero to the computer, then follow the below:
Open the Arduino IDE and find click the “Tools” icon, find “Board” and select the corresponding board.
When using the Catduino Zero, please choose the “Arduino Pro or Pro Mini”
Remember to click the “Serial Port” to choose the corresponding port, the port is normally named “COM7”.
Then you can edit the program.
We can have a test, the blinking led program is as below:
[code]
void setup() {
// initialize digital pin LED_BUILTIN as an output.
pinMode(LED_BUILTIN, OUTPUT);
}
// the loop function runs over and over again forever
void loop() {
digitalWrite(LED_BUILTIN, HIGH); // turn the LED on (HIGH is the voltage level)
delay(1000); // wait for a second
digitalWrite(LED_BUILTIN, LOW); // turn the LED off by making the voltage LOW
delay(1000); // wait for a second
}
[/code]
Then the green led will twinkle in by the frequency of a second.
Resource
Program
Datesheet
